
Tags
Background light, creativity, Lightroom, Natural Light, No Flash, Photo information, Photo postwork, Photography, Photography information, Photography postwork, photos
How many times have you taken a picture of a beautiful object with a bright background and didn’t want to have the harshness of a flash? Your eye sees every detail of that object and the light from the background just makes it pop, right? But then when you look at your image, it comes out like this:
In the past, when shooting with film, this could be somewhat corrected in the darkroom if you were lucky enough to have one (I wasn’t so lucky). You would have to take several images at different settings and work with “stacking” them to catch all the detail, and/or dodge and burn in the darkroom. Even before all the wonderful programs out there for digital cameras today, you still had to frame your settings and combine those images into one.
Now, everyone can take a shot and change it completely in a post-processing program with ease. And in many cases, may not need to “stack” photos. Today, I am going to give you a step by step process to lighten forefront images simply in Lightroom Classic.
Step 1: Easy. Download your image to Lightroom and make any straightening, cropping, and/or spot removal at this point. Don’t worry too much about the cropping. I usually will do this at the end but it can be done at any time.
Step 2: Make a “virtual copy” to work on. Right click on original image. Look for “create virtual copy” in the drop down list. Click on it. (Always work on a virtual copy and keep your original “clean”.)
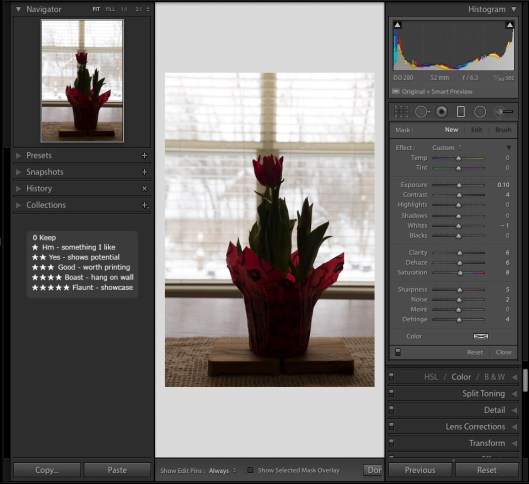
Step 3: Under “BASIC” on the right side of the screen, bump up the exposure, adjust the contrast, highlights, shadows, whites and blacks. I always add a little bit of clarity. My adjustments are below.

REPEAT STEP TWO. (Right click on the image you are working on, not the original.)
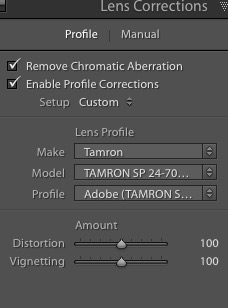
Step 4: Move down to “Lens Corrections”. Check Remove Chromatic Aberration and Enable Profile Correction. Below that, make sure your lens profile is correct. It actually does change the image a bit based on what lens you use.
Step 5: Next, click on the “Detail” section. Under “Noise Reduction, adjust the Luminance (I always do this with the image magnified to 100% to see the detail), and Detail. To ensure the program understood you want the color nice and smooth as well as the detail, adjust those also.

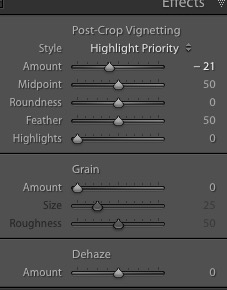
Step 6: “Effects.” This step also can be done at the end instead of here. I add some vignette at this point. No real reason other than it gives me an idea of how my finished image will come out as I continue to work on it.
You should immediately see some more of the object begin to appear as it has below.

REPEAT STEP TWO. (Right click on the image you are working on, not the original)
Step 7: Now comes the fun part. Using the brush, which actually looks like a microphone with dots around the head, and laying sideways in the upper right corner of the editing side, you are going to paint in more light. I only wanted the flower to have more light and color, and not the background. First, bump up the Shadow slider to 100% so you can see what you are “painting”. Once you have the object highlighted, now move the slider down (in this case, I set my shadow at 32). You can now play with the sliders until the image is the way you want. My settings are listed below. Make sure you press the “done” button in the lower right section of the main image. You want these settings to remain as they are should you decide to do more painting later.

Step 8: After completing the last step, I decided to go back into “Basic” and readjust some of the sliders. My end result is not too bad. Just needs one more small adjustment.

And voila! After a little bit more cropping and Brush light adjustment the tips of the flower, I am pleased with the final product. The flower is not overpowering and the background light has been reduced. It looks natural. This is the outcome I wanted.

It may seem like a lot of steps (and it is!) but they are not difficult and only take seconds to do.
I know there will be those who might feel they would want more light on the flower. Remember this is from ONE image. You can only adjust the light in the image just so far before pixilation occurs. There is another process that would add more light but it entails combining several images taken with different setting. I will cover that in another blog. In the meantime, have some fun playing with your sliders and Brush in Lightroom.
