• KES Collections
  • About

KES Photography

~ Photographic Techniques Simplified

KES Photography

Tag Archives: Photography postwork

Merging in Lightroom

14 Wednesday Mar 2018

Posted by Kathleen Scanlan in Lightroom Tips

≈ Leave a comment

Tags

creativity, images, information, Lightroom, Lightroom CC, Lightroom information, Lightroom merge, Merge, Merging images, Natural Light, Photography, Photography information, Photography postwork, post-work

When Lightroom was initially introduced to the market, it did not have the means to merge photos together. You had to use Photoshop to create a multi-layered image. Today, you can do that work right inside Lightroom with ease.

When shooting without a flash and with a bright background, the image in the front of the light will come out very dark. Now, no one wants the main image “in the dark”.  In the photos I am using for an example of bright backgrounds, I didn’t want to use a flash and didn’t want to lose the background either by opening up the stops to accommodate the image in the forefront.  So, I headed to Lightroom for a solution!
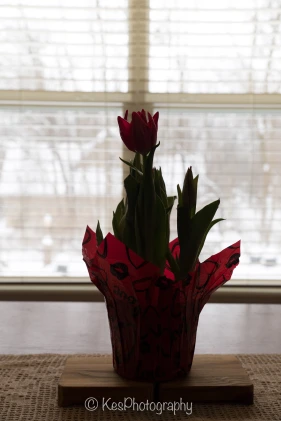
Orignal-7158.jpg

Lightroom now allows you to merge two or more images by compressing all the image data into one HDR image using very simple steps. Don’t be put off by “HDR”. In this instance of over-bright background, it is just a beginning point.  You can still adjust the final HDR product to your vision.

If you are steady-handed, shoot three or more photos with different speed stops without moving your focus.   For this article, I used my Canon 6D on a tripod and set my camera to shoot +/- one stop which means it will shoot the scene at a base stop that I set, then shoot ¾ higher (+3/4) and ¾ down (-3/4). I rarely do a full stop either way.  I set my ISO to 200 although I could have gone higher but didn’t want graininess in the images. Last but not least, my f-stop was set at 6.3.

Another way to shoot is to start at the high end of the speed you want to use and shut down a -1/2 stop for several more images.  The outcome will be the same.  This can also be done in reverse by adding +1/2 stop.

 The most important thing to remember when merging photos in Lightroom is that they are to be unprocessed. Another words do not do any post work on the images you plan on using.

Here are the two (yep, only two) steps for merging photos in Lightroom:

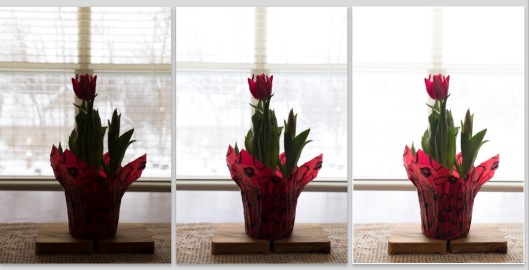
  1. Select the photos you wish to merge together. They have to be in consecutive order and have + or minus (-) speed settings for this to work (as mentioned above).  On a Mac, click on the first image and Cmd/Shift-click on the last image in Lightroom Classic CC to select the group of images you wish to use. I chose to use the three below.
Screen Shot 2018-03-07 at 1.29.11 PM.jpg

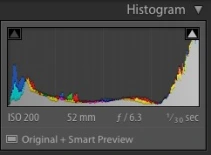
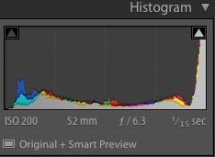
The histograms of each shot shows that I used shutter speeds of 1/80, 1/30, and 1/15 (the reason 1/60 is missing is because I deleted it before deciding to merge the images.  (Accidentally tripped over the tripod and the image was blurry!  Not a good idea…)
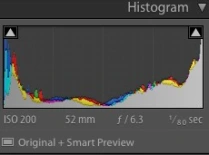
image 1.jpg Image 2.jpg Screen Shot 2018-03-07 at 1.32.16 PM.jpg

  1. Select Photo > Photo Merge > HDR. or press Ctrl+H.  Photo Merge is just below “Edit In”.
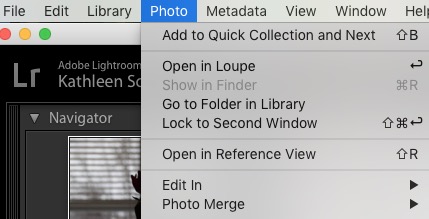
Step 2a.jpg

  1. Another box (HDR preview box) will pop open. This is where your final image will be created. You can select or deselect the following:

Auto Tone: Provides a good starting point for an evenly-toned merged image.  You can turn this off and see what happens.  Don’t panic if you see a dark image.  All the data is still there.  Lightroom just didn’t make adjusts; you can do this once  you accept the preview.
Auto Align: Useful if the images being merged have slight movement from shot to shot. Enable this option if the images were shot using a handheld camera. Enabling this option may not be necessary if the images were shot using a tripod.  The way to tell if you really need it is to zoom in on the image to see if everything aligns.

While you are making your choices, Lightroom is busy combining your chosen photos into one preview.
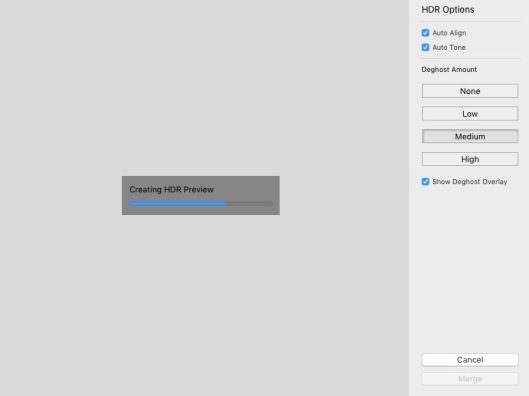
Screen Shot 2018-03-07 at 11.34.59 AM.jpg

After deciding on those two options, you can choose how much “deghosting” you may need.  This occurs when some transparency from the one image to the next occurs while merging.  For example: a bird or plane flying across the sky. Each frame will have the bird or plane in a different position. You might see the ghost of the bird or plane in each position in the final image.  Deghost will take care of this.

You can preview the effects of these settings right within the dialog box once the image downloads.   Play with it a bit so you understand how the options affect your final image.  Then, accept the image.

My final HDR image turned out to be a far cry from what I envisioned.  As you can see, it came out rather bright while the plant detail is nice and sharp.  A little too bright for me!  (Remember, earlier I stated that you can adjust your final HDR image.)

HDR 1-2.jpg


When you merge images in Lightroom, the program creates a new file/image. It combines all the data from the images you used to create the HDR image and compresses that date into one file. This means you can adjust the final image as if it was the original shot but with a whole lot more data to work with.  In my example, it probably had three times the image data since I used three images.


Because my final HDR image was not quite what I wanted (again, I could have turned Auto Tone off and made adjustments from that image), I decided to do some further adjustments in Lightroom on the new file/image.  Now the image looks much more natural and the details of the plant are still nice and sharp.  This, I like!
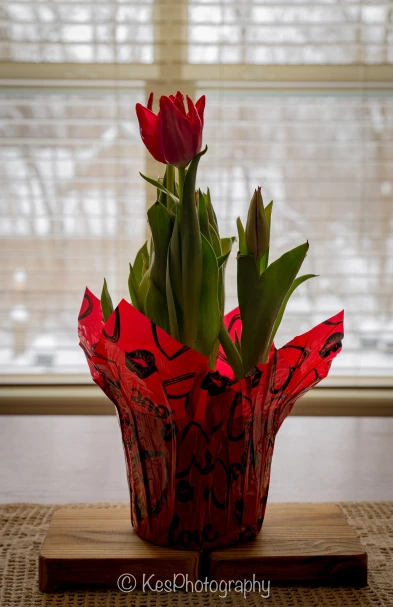
HDR Final-2.jpg

HDR 2a.jpgHDR 2.jpg


So the next time you want to play with your camera, try this neat trick out. Take several shots of one object, using several different speeds. Combined them in Lightroom and see what you can create. Have fun!

Advertisement

Share this:

  • Email
  • Twitter
  • Facebook
  • Pinterest
  • LinkedIn

Like this:

Like Loading...

Lightroom – How to Correct Backlight Issue

27 Tuesday Feb 2018

Posted by Kathleen Scanlan in Lightroom Tips

≈ Leave a comment

Tags

Background light, creativity, Lightroom, Natural Light, No Flash, Photo information, Photo postwork, Photography, Photography information, Photography postwork, photos

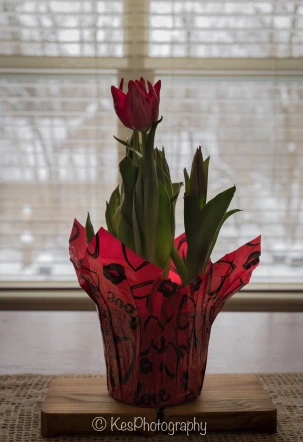
How many times have you taken a picture of a beautiful object with a bright background and didn’t want to have the harshness of a flash? Your eye sees every detail of that object and the light from the background just makes it pop, right? But then when you look at your image, it comes out like this:

Screen Shot 2018-02-18 at 2.50.43 PM.jpg

In the past, when shooting with film, this could be somewhat corrected in the darkroom if you were lucky enough to have one (I wasn’t so lucky). You would have to take several images at different settings and work with “stacking” them to catch all the detail, and/or dodge and burn in the darkroom. Even before all the wonderful programs out there for digital cameras today, you still had to frame your settings and combine those images into one.

Now, everyone can take a shot and change it completely in a post-processing program with ease. And in many cases, may not need to “stack” photos. Today, I am going to give you a step by step process to lighten forefront images simply in Lightroom Classic.

Step 1: Easy. Download your image to Lightroom and make any straightening, cropping, and/or spot removal at this point. Don’t worry too much about the cropping. I usually will do this at the end but it can be done at any time.

Step 2: Make a “virtual copy” to work on. Right click on original image. Look for “create virtual copy” in the drop down list. Click on it. (Always work on a virtual copy and keep your original “clean”.)

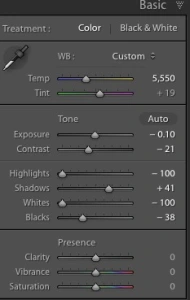
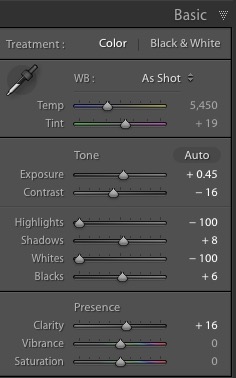
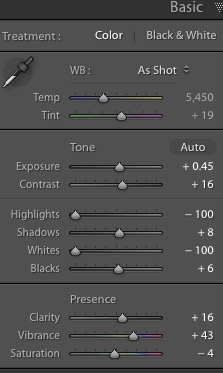
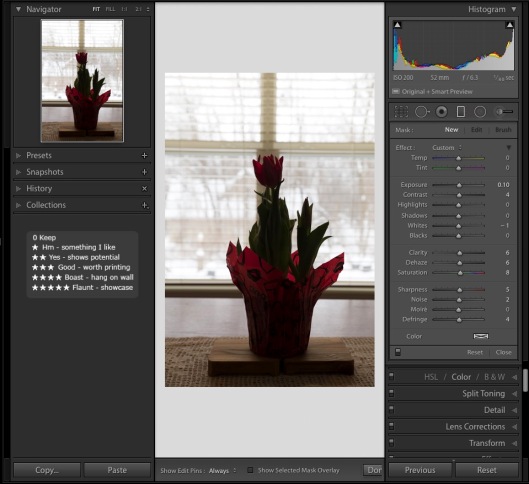
 Step 3: Under “BASIC” on the right side of the screen, bump up the exposure, adjust the contrast, highlights, shadows, whites and blacks. I always add a little bit of clarity. My adjustments are below.

Basic.jpg

REPEAT STEP TWO. (Right click on the image you are working on, not the original.)

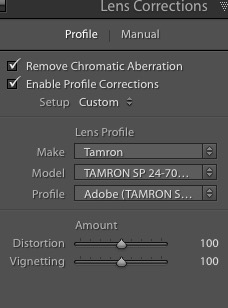
Step 4: Move down to “Lens Corrections”. Check Remove Chromatic Aberration and Enable Profile Correction. Below that, make sure your lens profile is correct. It actually does change the image a bit based on what lens you use.

Lens Correction.jpg

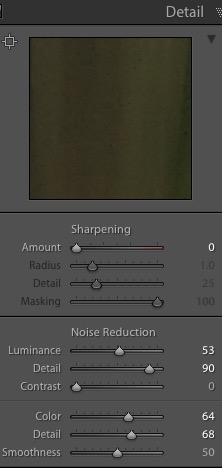
Step 5: Next, click on the “Detail” section. Under “Noise Reduction, adjust the Luminance (I always do this with the image magnified to 100% to see the detail), and Detail. To ensure the program understood you want the color nice and smooth as well as the detail, adjust those also.

Detail.jpg

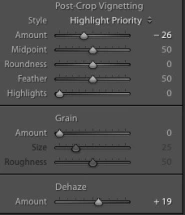
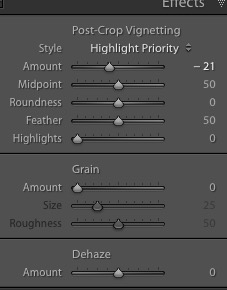
Step 6: “Effects.” This step also can be done at the end instead of here. I add some vignette at this point. No real reason other than it gives me an idea of how my finished image will come out as I continue to work on it.

Effects.jpg


You should immediately see some more of the object begin to appear as it has below.

second-7158.jpg

REPEAT STEP TWO. (Right click on the image you are working on, not the original)

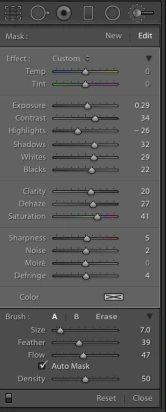
Step 7: Now comes the fun part. Using the brush, which actually looks like a microphone with dots around the head, and laying sideways in the upper right corner of the editing side, you are going to paint in more light. I only wanted the flower to have more light and color, and not the background. First, bump up the Shadow slider to 100% so you can see what you are “painting”. Once you have the object highlighted, now move the slider down (in this case, I set my shadow at 32). You can now play with the sliders until the image is the way you want. My settings are listed below. Make sure you press the “done” button in the lower right section of the main image. You want these settings to remain as they are should you decide to do more painting later.

Brush.jpg

Step 8: After completing the last step, I decided to go back into “Basic” and readjust some of the sliders. My end result is not too bad. Just needs one more small adjustment.

Basic 2.jpg

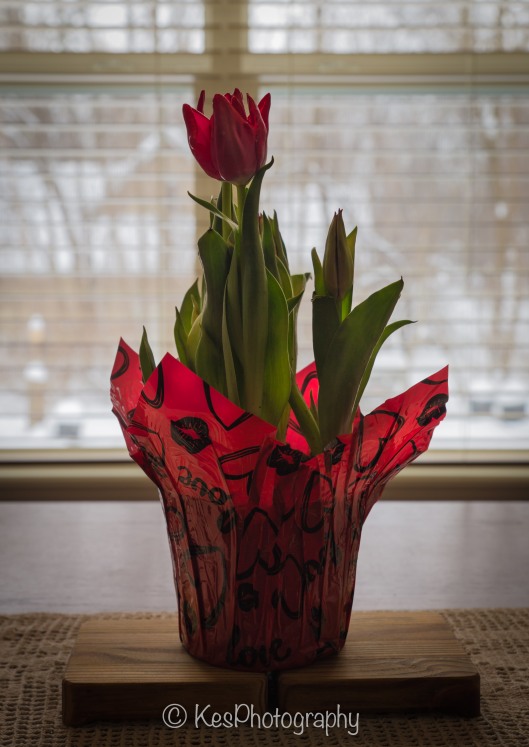
And voila! After a little bit more cropping and Brush light adjustment the tips of the flower, I am pleased with the final product. The flower is not overpowering and the background light has been reduced. It looks natural. This is the outcome I wanted.

Final-7158.jpg

It may seem like a lot of steps (and it is!) but they are not difficult and only take seconds to do.

I know there will be those who might feel they would want more light on the flower. Remember this is from ONE image. You can only adjust the light in the image just so far before pixilation occurs. There is another process that would add more light but it entails combining several images taken with different setting. I will cover that in another blog.   In the meantime, have some fun playing with your sliders and Brush in Lightroom.


Share this:

  • Email
  • Twitter
  • Facebook
  • Pinterest
  • LinkedIn

Like this:

Like Loading...

Subscribe

  • Entries (RSS)
  • Comments (RSS)

Archives

  • March 2018
  • February 2018
  • December 2017
  • November 2017
  • October 2017
  • October 2015
  • September 2015

Categories

  • composition
  • Lightroom Tips
  • Photography
  • Uncategorized

Meta

  • Register
  • Log in

Blog at WordPress.com.

Privacy & Cookies: This site uses cookies. By continuing to use this website, you agree to their use.
To find out more, including how to control cookies, see here: Cookie Policy
  • Follow Following
    • KES Photography
    • Already have a WordPress.com account? Log in now.
    • KES Photography
    • Customize
    • Follow Following
    • Sign up
    • Log in
    • Report this content
    • View site in Reader
    • Manage subscriptions
    • Collapse this bar
 

Loading Comments...
 

    %d bloggers like this: