• KES Collections
  • About

KES Photography

~ Photographic Techniques Simplified

KES Photography

Tag Archives: Photo information

Lightroom – How to Correct Backlight Issue

27 Tuesday Feb 2018

Posted by Kathleen Scanlan in Lightroom Tips

≈ Leave a comment

Tags

Background light, creativity, Lightroom, Natural Light, No Flash, Photo information, Photo postwork, Photography, Photography information, Photography postwork, photos

How many times have you taken a picture of a beautiful object with a bright background and didn’t want to have the harshness of a flash? Your eye sees every detail of that object and the light from the background just makes it pop, right? But then when you look at your image, it comes out like this:
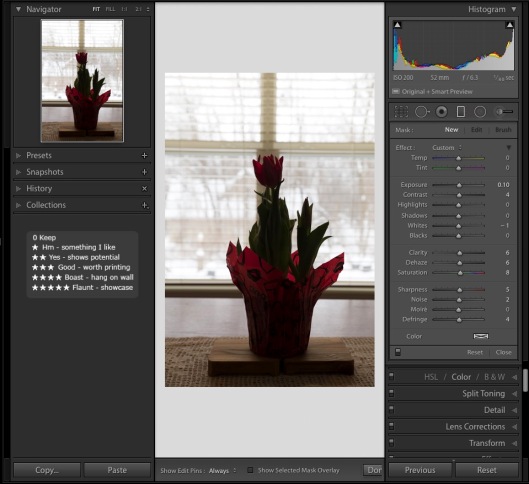
Screen Shot 2018-02-18 at 2.50.43 PM.jpg

In the past, when shooting with film, this could be somewhat corrected in the darkroom if you were lucky enough to have one (I wasn’t so lucky). You would have to take several images at different settings and work with “stacking” them to catch all the detail, and/or dodge and burn in the darkroom. Even before all the wonderful programs out there for digital cameras today, you still had to frame your settings and combine those images into one.

Now, everyone can take a shot and change it completely in a post-processing program with ease. And in many cases, may not need to “stack” photos. Today, I am going to give you a step by step process to lighten forefront images simply in Lightroom Classic.

Step 1: Easy. Download your image to Lightroom and make any straightening, cropping, and/or spot removal at this point. Don’t worry too much about the cropping. I usually will do this at the end but it can be done at any time.

Step 2: Make a “virtual copy” to work on. Right click on original image. Look for “create virtual copy” in the drop down list. Click on it. (Always work on a virtual copy and keep your original “clean”.)

 Step 3: Under “BASIC” on the right side of the screen, bump up the exposure, adjust the contrast, highlights, shadows, whites and blacks. I always add a little bit of clarity. My adjustments are below.
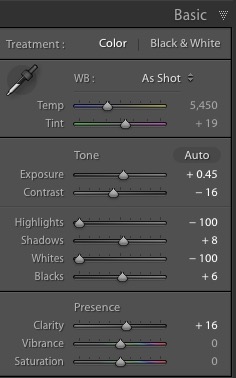
Basic.jpg

REPEAT STEP TWO. (Right click on the image you are working on, not the original.)

Step 4: Move down to “Lens Corrections”. Check Remove Chromatic Aberration and Enable Profile Correction. Below that, make sure your lens profile is correct. It actually does change the image a bit based on what lens you use.
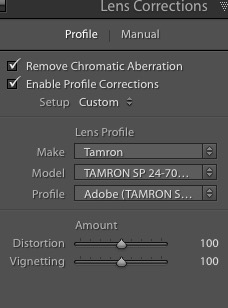
Lens Correction.jpg

Step 5: Next, click on the “Detail” section. Under “Noise Reduction, adjust the Luminance (I always do this with the image magnified to 100% to see the detail), and Detail. To ensure the program understood you want the color nice and smooth as well as the detail, adjust those also.
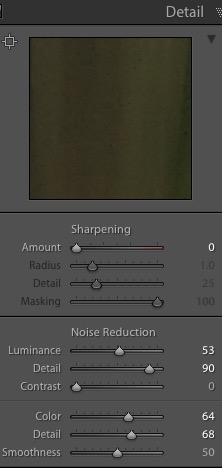
Detail.jpg

Step 6: “Effects.” This step also can be done at the end instead of here. I add some vignette at this point. No real reason other than it gives me an idea of how my finished image will come out as I continue to work on it.
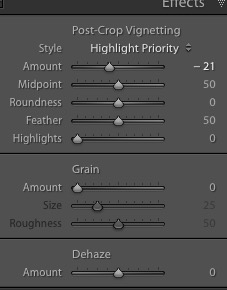
Effects.jpg


You should immediately see some more of the object begin to appear as it has below.
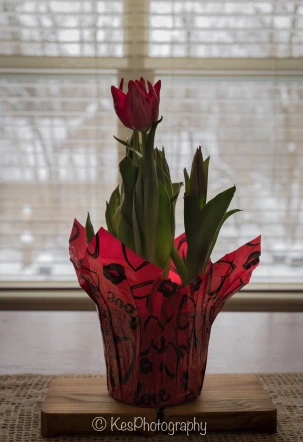
second-7158.jpg

REPEAT STEP TWO. (Right click on the image you are working on, not the original)

Step 7: Now comes the fun part. Using the brush, which actually looks like a microphone with dots around the head, and laying sideways in the upper right corner of the editing side, you are going to paint in more light. I only wanted the flower to have more light and color, and not the background. First, bump up the Shadow slider to 100% so you can see what you are “painting”. Once you have the object highlighted, now move the slider down (in this case, I set my shadow at 32). You can now play with the sliders until the image is the way you want. My settings are listed below. Make sure you press the “done” button in the lower right section of the main image. You want these settings to remain as they are should you decide to do more painting later.
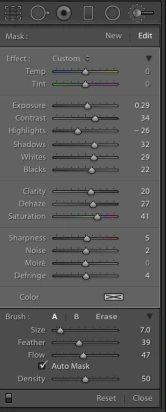
Brush.jpg

Step 8: After completing the last step, I decided to go back into “Basic” and readjust some of the sliders. My end result is not too bad. Just needs one more small adjustment.
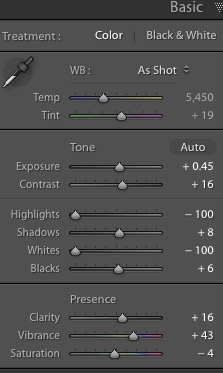
Basic 2.jpg

And voila! After a little bit more cropping and Brush light adjustment the tips of the flower, I am pleased with the final product. The flower is not overpowering and the background light has been reduced. It looks natural. This is the outcome I wanted.
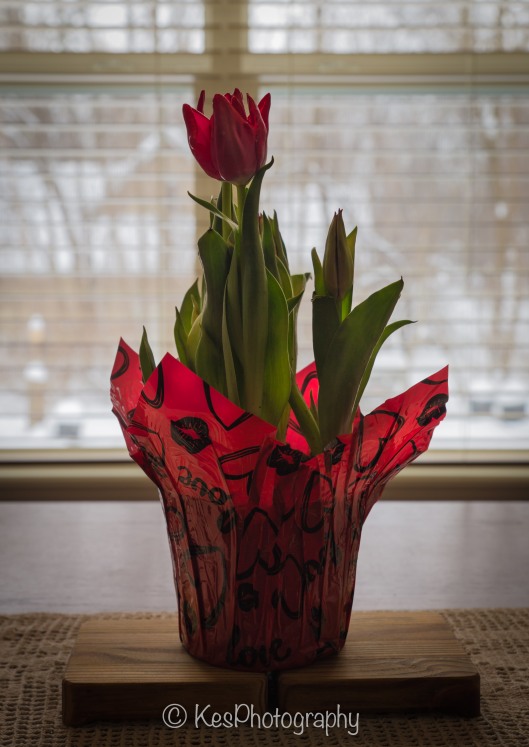
Final-7158.jpg

It may seem like a lot of steps (and it is!) but they are not difficult and only take seconds to do.

I know there will be those who might feel they would want more light on the flower. Remember this is from ONE image. You can only adjust the light in the image just so far before pixilation occurs. There is another process that would add more light but it entails combining several images taken with different setting. I will cover that in another blog.   In the meantime, have some fun playing with your sliders and Brush in Lightroom.


Advertisement

Share this:

  • Email
  • Twitter
  • Facebook
  • Pinterest
  • LinkedIn

Like this:

Like Loading...

How Close Can You Go?

09 Friday Oct 2015

Posted by Kathleen Scanlan in Photography

≈ Leave a comment

Tags

Background blur, close-up, composition, focus, framing an image, Photo information, Photography, Photography information, zooming

This week, I thought that instead of just harping on some of the do’s and don’ts of composition, I would show you what I did with a Canon DSLR (Digital Single Lens Reflex).  This can also be accomplished with a point and shoot camera or even a cell phone one.

In the past, I have talked about thinking before shooting.  What do you want in the image?  What is your subject matter?  What “feel” do you want the viewer to have?  What’s the story?  The next step is to take the image, of course.  So….

I went for a walk on a  spring day.  It was slightly cloudy but the sun was coming through enough so that a flash was not required (I prefer non-flash images, anyway).  As I walked down my city sidewalk, my head was on a swivel, looking for that one image that yelled “spring has arrived!”  Most people tend to look toward the ground for fresh greenery just breaking ground after a long winter.  Me?  Well, there are days when getting low to the ground for a good shot just aren’t in the cards!  As it was this particular day…

So, heads up and full speed ahead.  Literally.  My eyes were on the trees.  Unfortunately, they didn’t seem to be quite ready for spring.  The branches appeared to be bare.  No apparent budding happening yet.  At least it seemed that way so I changed my though process (I mentioned this in a previous blog. Don’t be afraid to change your mind when out on a photo jaunt).  My new thought was to capture something that reflected the last of winter, like a brown leaf or a fallen acorn left over from last year.  And voila!  I found what looked like an old brown tree flower.

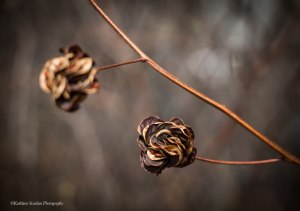
Brown Flower Seed

Brown Flower Seed

It looked so lonesome on the brown branch.  As if it had weathered the rough winter and still hung on for good measure.  The petals were still nice and crisp.  The last of the fall tree flowers.  That was my thought, anyway, when I looked at it.  (Pretty sure there are no such things as Fall tree flowers but my brain doesn’t always accept common sense when I am out with my camera!)

My thought process; focus on the forefront one and keep the farther one out of focus because the back one did not have the nice flowery look to it.  The petals seemed to be bent backward from the center (you can kind of see it in the picture) and the sun highlighted them a bit.  Also, I wanted the background very blurry because it was distracting with fencing and buildings.

Since I was using my DSLR on manual mode, I was able to play with a few settings (ISO, F-stop, and speed) to get what I wanted.  My lens was a 18-135mm zoomed to about 64mm.  We will get more into these numbers and how to play with them in another blog for those of you who have the ability to do it with your particular camera.  But most digital point and shoot cameras as well as telephone cameras have the ability to zoom, so you should be able to get somewhat the same effect as I did.

After finally settling on the image I “envisioned” as the final product, I downloaded it to my computer.  Mind you, I took about 30 images from different angles before I decided this is the one that captured what I wanted to say.  The digital age is a wonderful thing for photography!  No more wasting film or paying for processing of unwanted images!

Now it was time to check out all the details of the petals.  This is when I received my shock…this was not a flower at all.  It was a tree bud of sorts.  The so called-petals were protecting the seeds that the tree would eventually drop.  Since I tend to be very focused when I look through the viewfinder attempting to get the “framing” the way I want, it means sometimes I miss some of the finer details that the camera will pick up.  My focus was on the “flower” and not what it was hiding.

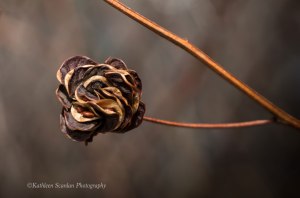
In the middle of the bud are several seeds.  You can seem them in the image below. I cropped the image so that you could see what I missed!   It’s probably one of my favorites of bud images as I have never seen one like it before or since. The bud almost seems to look like a face and is sticking its tongue out at me (that’s just my imagination running wild!).

Close-up of

Close-up of “flower”

As you can see, only the bud shows detail and the branches are out of focus.  All attention is on the “petals” and when you look closely, you see the seeds.  This is what I had talked about in previous blogs about composition.  When someone looks at your image, what draws them into it?  Or is it “flat”, meaning that what you see is what you get.  Had I simply shot this piece without zooming in, the background would have detracted from the bud.  Everything around it would have been as sharp as the bud and the person looking at the image would probably miss the seeds all together.

But with focusing and zooming in on my subject (and a few minor adjustments), the viewer now sees the detail and is drawn into the bud by the white petal that supports the seeds.  My subject matter stands out without anything to impede on the visual aspect of it.  The out-of-focus bud in the background lets the viewer know that this is some kind of tree or bush and not a ground flower.  I purposely placed the subject in the lower right quadrant of the frame so that the viewer would see it first and the lines (branches) lead into the image to show that there are other ones like it on this tree. It would have been nice to have had the sharper bud in the upper left quadrant with the “lines” leading to it but mother nature decided that was not to be.  Sometimes you just have to go with what you got. And yes, this is the actual color of the bud.  Definitely not a spring color!

So, the next time you head out with your camera, look around.  Try getting closer to your subject.  You never know just what your camera will capture.  The human eye adjusts and takes in tons of information.  It’s the camera that actually captures what you really see.  Grab your camera and go!

41.878114 -87.629798

Share this:

  • Email
  • Twitter
  • Facebook
  • Pinterest
  • LinkedIn

Like this:

Like Loading...

I’ve Finally Done It…!

12 Saturday Sep 2015

Posted by Kathleen Scanlan in Photography

≈ 3 Comments

Tags

Adobe, information, Lightroom, Lightroom CC, Photo information, photo work, Photography, Photography information, photos, Photoshop, Photoshop CC, post-work

Hi Everyone! I have finally entered the world of Blogging that everyone else has been in for years! Sometimes it takes time for those of us who were not born into the computer age to finally figure out how to use the “techy” stuff.

After I retired from my second love (where I had to make money to help raise a family), I jumped back into photography only to find myself completely perplexed and confused with all the new technology in this arena. Although I love photography and all that it entails, I was lost amid all the new digital cameras, post work programs, and information available on the internet. Half the time, I would read an article and still be lost as I don’t have a computer or techy mindset. All I wanted was an answer to a simple question in PLAIN english. And so, a blog is born…

In future blogs, which I plan on keeping it short and to the point (at least that’s the plan. Who wants to read long, run-on articles all the time?), I will share what I learn as I move on with my photography. Currently, I use both Photoshop CC and Lightroom CC for my filing and post-work (boy, were they a struggle to learn for me!).

I invite you to join me on my journey into the world of digital photography as I find my way around . Future blogs will contain helpful hints on composition, framing, and post -work, all written in a plain, down to earth language.

Well, here goes nothing…click!

41.878114 -87.629798

Share this:

  • Email
  • Twitter
  • Facebook
  • Pinterest
  • LinkedIn

Like this:

Like Loading...

Subscribe

  • Entries (RSS)
  • Comments (RSS)

Archives

  • March 2018
  • February 2018
  • December 2017
  • November 2017
  • October 2017
  • October 2015
  • September 2015

Categories

  • composition
  • Lightroom Tips
  • Photography
  • Uncategorized

Meta

  • Register
  • Log in

Create a free website or blog at WordPress.com.

Privacy & Cookies: This site uses cookies. By continuing to use this website, you agree to their use.
To find out more, including how to control cookies, see here: Cookie Policy
  • Follow Following
    • KES Photography
    • Already have a WordPress.com account? Log in now.
    • KES Photography
    • Customize
    • Follow Following
    • Sign up
    • Log in
    • Report this content
    • View site in Reader
    • Manage subscriptions
    • Collapse this bar
 

Loading Comments...
 

    %d bloggers like this: