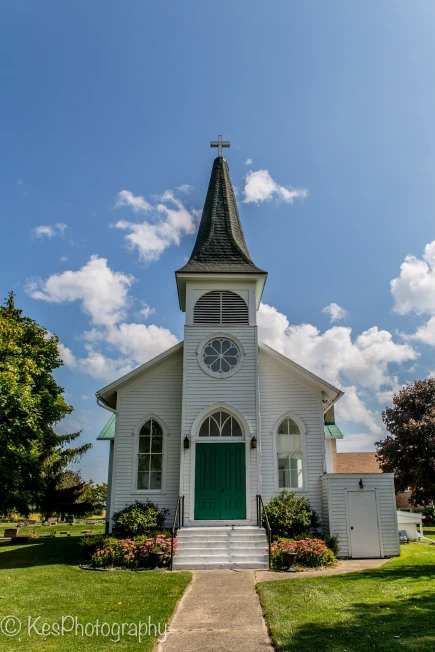
• KES Collections
  • About

KES Photography

~ Photographic Techniques Simplified

KES Photography

Tag Archives: Photography information

Merging in Lightroom

14 Wednesday Mar 2018

Posted by Kathleen Scanlan in Lightroom Tips

≈ Leave a comment

Tags

creativity, images, information, Lightroom, Lightroom CC, Lightroom information, Lightroom merge, Merge, Merging images, Natural Light, Photography, Photography information, Photography postwork, post-work

When Lightroom was initially introduced to the market, it did not have the means to merge photos together. You had to use Photoshop to create a multi-layered image. Today, you can do that work right inside Lightroom with ease.

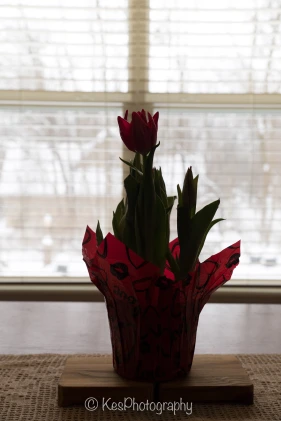
When shooting without a flash and with a bright background, the image in the front of the light will come out very dark. Now, no one wants the main image “in the dark”.  In the photos I am using for an example of bright backgrounds, I didn’t want to use a flash and didn’t want to lose the background either by opening up the stops to accommodate the image in the forefront.  So, I headed to Lightroom for a solution!
Orignal-7158.jpg

Lightroom now allows you to merge two or more images by compressing all the image data into one HDR image using very simple steps. Don’t be put off by “HDR”. In this instance of over-bright background, it is just a beginning point.  You can still adjust the final HDR product to your vision.

If you are steady-handed, shoot three or more photos with different speed stops without moving your focus.   For this article, I used my Canon 6D on a tripod and set my camera to shoot +/- one stop which means it will shoot the scene at a base stop that I set, then shoot ¾ higher (+3/4) and ¾ down (-3/4). I rarely do a full stop either way.  I set my ISO to 200 although I could have gone higher but didn’t want graininess in the images. Last but not least, my f-stop was set at 6.3.

Another way to shoot is to start at the high end of the speed you want to use and shut down a -1/2 stop for several more images.  The outcome will be the same.  This can also be done in reverse by adding +1/2 stop.

 The most important thing to remember when merging photos in Lightroom is that they are to be unprocessed. Another words do not do any post work on the images you plan on using.

Here are the two (yep, only two) steps for merging photos in Lightroom:

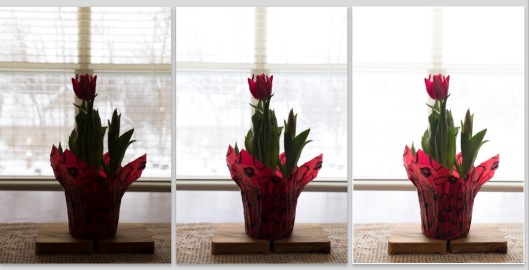
  1. Select the photos you wish to merge together. They have to be in consecutive order and have + or minus (-) speed settings for this to work (as mentioned above).  On a Mac, click on the first image and Cmd/Shift-click on the last image in Lightroom Classic CC to select the group of images you wish to use. I chose to use the three below.
Screen Shot 2018-03-07 at 1.29.11 PM.jpg

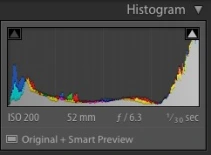
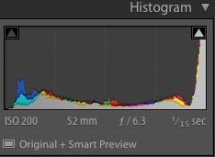
The histograms of each shot shows that I used shutter speeds of 1/80, 1/30, and 1/15 (the reason 1/60 is missing is because I deleted it before deciding to merge the images.  (Accidentally tripped over the tripod and the image was blurry!  Not a good idea…)
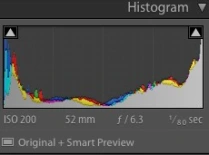
image 1.jpg Image 2.jpg Screen Shot 2018-03-07 at 1.32.16 PM.jpg

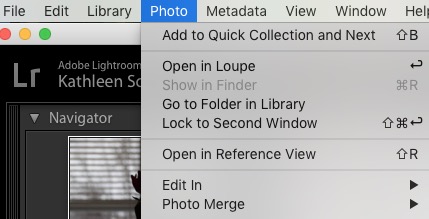
  1. Select Photo > Photo Merge > HDR. or press Ctrl+H.  Photo Merge is just below “Edit In”.
Step 2a.jpg

  1. Another box (HDR preview box) will pop open. This is where your final image will be created. You can select or deselect the following:

Auto Tone: Provides a good starting point for an evenly-toned merged image.  You can turn this off and see what happens.  Don’t panic if you see a dark image.  All the data is still there.  Lightroom just didn’t make adjusts; you can do this once  you accept the preview.
Auto Align: Useful if the images being merged have slight movement from shot to shot. Enable this option if the images were shot using a handheld camera. Enabling this option may not be necessary if the images were shot using a tripod.  The way to tell if you really need it is to zoom in on the image to see if everything aligns.

While you are making your choices, Lightroom is busy combining your chosen photos into one preview.

Screen Shot 2018-03-07 at 11.34.59 AM.jpg

After deciding on those two options, you can choose how much “deghosting” you may need.  This occurs when some transparency from the one image to the next occurs while merging.  For example: a bird or plane flying across the sky. Each frame will have the bird or plane in a different position. You might see the ghost of the bird or plane in each position in the final image.  Deghost will take care of this.

You can preview the effects of these settings right within the dialog box once the image downloads.   Play with it a bit so you understand how the options affect your final image.  Then, accept the image.

My final HDR image turned out to be a far cry from what I envisioned.  As you can see, it came out rather bright while the plant detail is nice and sharp.  A little too bright for me!  (Remember, earlier I stated that you can adjust your final HDR image.)

HDR 1-2.jpg


When you merge images in Lightroom, the program creates a new file/image. It combines all the data from the images you used to create the HDR image and compresses that date into one file. This means you can adjust the final image as if it was the original shot but with a whole lot more data to work with.  In my example, it probably had three times the image data since I used three images.


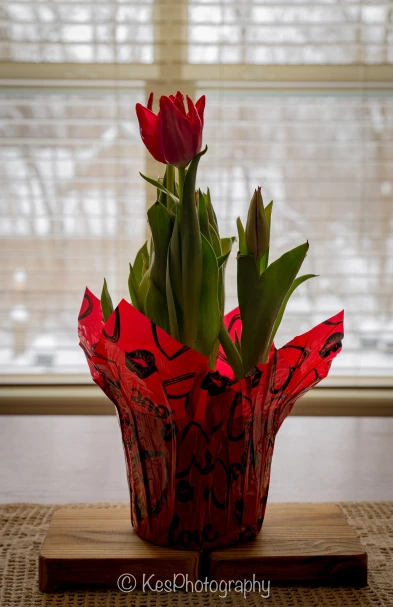
Because my final HDR image was not quite what I wanted (again, I could have turned Auto Tone off and made adjustments from that image), I decided to do some further adjustments in Lightroom on the new file/image.  Now the image looks much more natural and the details of the plant are still nice and sharp.  This, I like!
HDR Final-2.jpg

HDR 2a.jpgHDR 2.jpg


So the next time you want to play with your camera, try this neat trick out. Take several shots of one object, using several different speeds. Combined them in Lightroom and see what you can create. Have fun!

Advertisement

Share this:

  • Email
  • Twitter
  • Facebook
  • Pinterest
  • LinkedIn

Like this:

Like Loading...

Lightroom – How to Correct Backlight Issue

27 Tuesday Feb 2018

Posted by Kathleen Scanlan in Lightroom Tips

≈ Leave a comment

Tags

Background light, creativity, Lightroom, Natural Light, No Flash, Photo information, Photo postwork, Photography, Photography information, Photography postwork, photos

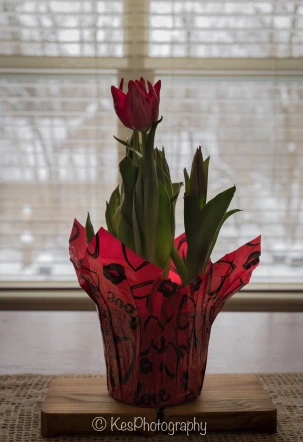
How many times have you taken a picture of a beautiful object with a bright background and didn’t want to have the harshness of a flash? Your eye sees every detail of that object and the light from the background just makes it pop, right? But then when you look at your image, it comes out like this:

Screen Shot 2018-02-18 at 2.50.43 PM.jpg

In the past, when shooting with film, this could be somewhat corrected in the darkroom if you were lucky enough to have one (I wasn’t so lucky). You would have to take several images at different settings and work with “stacking” them to catch all the detail, and/or dodge and burn in the darkroom. Even before all the wonderful programs out there for digital cameras today, you still had to frame your settings and combine those images into one.

Now, everyone can take a shot and change it completely in a post-processing program with ease. And in many cases, may not need to “stack” photos. Today, I am going to give you a step by step process to lighten forefront images simply in Lightroom Classic.

Step 1: Easy. Download your image to Lightroom and make any straightening, cropping, and/or spot removal at this point. Don’t worry too much about the cropping. I usually will do this at the end but it can be done at any time.

Step 2: Make a “virtual copy” to work on. Right click on original image. Look for “create virtual copy” in the drop down list. Click on it. (Always work on a virtual copy and keep your original “clean”.)

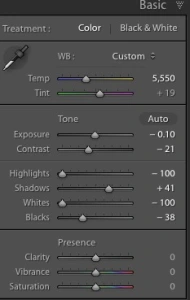
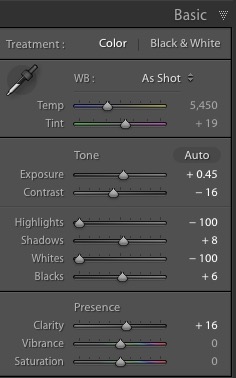
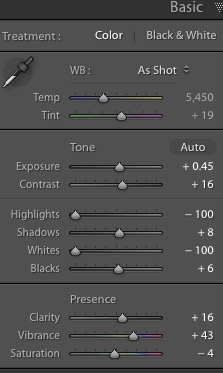
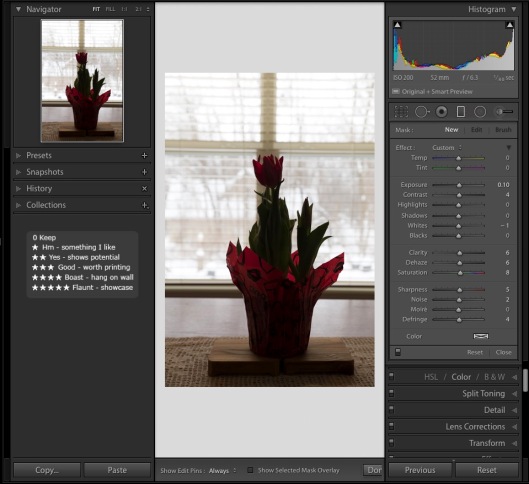
 Step 3: Under “BASIC” on the right side of the screen, bump up the exposure, adjust the contrast, highlights, shadows, whites and blacks. I always add a little bit of clarity. My adjustments are below.

Basic.jpg

REPEAT STEP TWO. (Right click on the image you are working on, not the original.)

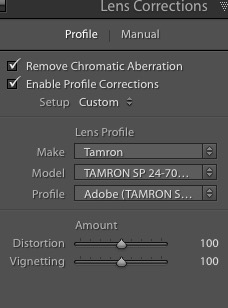
Step 4: Move down to “Lens Corrections”. Check Remove Chromatic Aberration and Enable Profile Correction. Below that, make sure your lens profile is correct. It actually does change the image a bit based on what lens you use.

Lens Correction.jpg

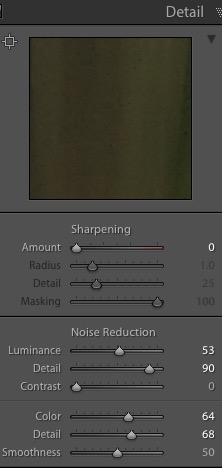
Step 5: Next, click on the “Detail” section. Under “Noise Reduction, adjust the Luminance (I always do this with the image magnified to 100% to see the detail), and Detail. To ensure the program understood you want the color nice and smooth as well as the detail, adjust those also.

Detail.jpg

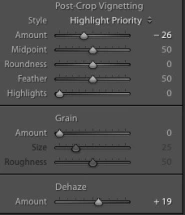
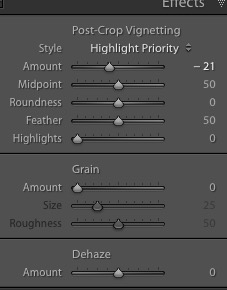
Step 6: “Effects.” This step also can be done at the end instead of here. I add some vignette at this point. No real reason other than it gives me an idea of how my finished image will come out as I continue to work on it.

Effects.jpg


You should immediately see some more of the object begin to appear as it has below.

second-7158.jpg

REPEAT STEP TWO. (Right click on the image you are working on, not the original)

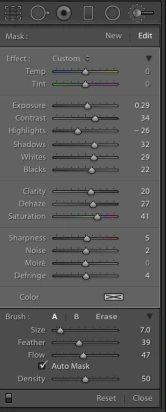
Step 7: Now comes the fun part. Using the brush, which actually looks like a microphone with dots around the head, and laying sideways in the upper right corner of the editing side, you are going to paint in more light. I only wanted the flower to have more light and color, and not the background. First, bump up the Shadow slider to 100% so you can see what you are “painting”. Once you have the object highlighted, now move the slider down (in this case, I set my shadow at 32). You can now play with the sliders until the image is the way you want. My settings are listed below. Make sure you press the “done” button in the lower right section of the main image. You want these settings to remain as they are should you decide to do more painting later.

Brush.jpg

Step 8: After completing the last step, I decided to go back into “Basic” and readjust some of the sliders. My end result is not too bad. Just needs one more small adjustment.

Basic 2.jpg

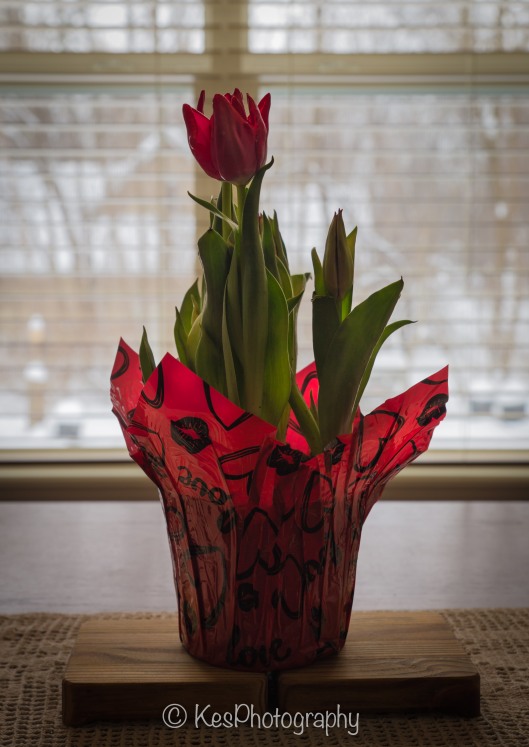
And voila! After a little bit more cropping and Brush light adjustment the tips of the flower, I am pleased with the final product. The flower is not overpowering and the background light has been reduced. It looks natural. This is the outcome I wanted.

Final-7158.jpg

It may seem like a lot of steps (and it is!) but they are not difficult and only take seconds to do.

I know there will be those who might feel they would want more light on the flower. Remember this is from ONE image. You can only adjust the light in the image just so far before pixilation occurs. There is another process that would add more light but it entails combining several images taken with different setting. I will cover that in another blog.   In the meantime, have some fun playing with your sliders and Brush in Lightroom.


Share this:

  • Email
  • Twitter
  • Facebook
  • Pinterest
  • LinkedIn

Like this:

Like Loading...

“What Happened…?”

08 Friday Dec 2017

Posted by Kathleen Scanlan in composition

≈ Leave a comment

Tags

composition, creativity, distortion, focus, image corrections, perspective, photo corrections, Photography, Photography information

Have you ever taken a picture and when you printed it out or viewed it on your computer or camera it didn’t look like the picture you thought you took? This is especially true when shooting buildings. Your eye sees the building as nice and tall with straight lines aiming towards the heavens. Yet, when you take the picture and look at it, it’s distorted? It happens a lot to beginners and even us in the middle. And then the big question becomes “why is this happening?”

I am not a pro nor am I beginner. I’m somewhere in the middle when it comes to photography. This means I enjoy taking images, manipulating them, and sharing them with those of the same mindset. So, I try to keep things simple and easy to understand. No technical verbiage for me. I’m that “whatchamacallit” person.

So here it is…one reason is that your perspective is off. For example, when you shoot close to a church and you step back to get the steeple in, you are changing the perspective. In the image below, you can see that the doors appear straight but as you take in the whole image, the rest of the church is distorted. The large windows seem to tilt in on the sides and everything in the middle seems to be fairly straight, although a bit tilted backward. Probably without even knowing it, you have had to tilt the camera up to capture the cross on the church as well as the front door.

Church #1-6667

I was standing just below the church, aiming slightly up which distorted the whole church except for what was at eye level (the doors) from where I was shooting. My lens was a 24-70mm zoom and I had it set at 24mm. It just didn’t work and I couldn’t step back any further as a very active street behind me restricted me from doing so!

How to correct it? Well, you can do several things:

  1. Change your angle. Step back so that you do not have to tilt your camera to capture the whole image. Sometimes you aren’t even aware that you are slightly tilting the camera to get everything within the camera frame.
  2. Not possible?  Option two is to not take the whole church. Move closer and capture just a window or the doors.
  3. Use a wide angle lens (if you have one)
  4. Take the shot the best you can. Then, in post processing, straighten it out as much as you can without causing more distortion. (More on this later)

I adjusted the horizontal and vertical lines of the image in Lightroom to help “straighten” out the church. As you can see below, I lost a lot of the content of the picture in post-processing. But at least you won’t get dizzy looking at it!

Church #2-6667

If you can’t change your position and don’t have a wide-angle lens, take the picture. Just ensure that your image doesn’t fill the frame like I did in the first picture and has plenty of border space around the church for post-process straightening. I didn’t and lost quite a bit of the image when I corrected the horizontal and vertical distortions in Lightroom.

This last image is of a church I had plenty of room to change my position to reduce the  in-camera distortion.  Although there is still a little bit of distortion, it is not very noticeable and the image is pleasing to the eye. (The small entrance to the right really was tilting toward the main building…!)  I did make some minor perspective changes, i.e., cropping/leveling and a little correction on the horizontal lines.  Other than that, this image is how I saw that little farm church that day.

Church #3-0741

So, the next time you are taking a picture, check to make sure your perspective is good; that you are on equal footing with the object that you are taking. If you don’t have the room to do that or a wide angle lens, then make sure you have enough clear space on all four sides in the viewfinder so that when you make your corrections in a post-processing program such as Lightroom, you don’t cut off anything of importance (like the cross on top of the steeple!).

There is another reason why the distortion occurs and it has to do with the camera itself.  And the fact the world is round!  But that’s for another blog…  Until next time, happy shooting!

Share this:

  • Email
  • Twitter
  • Facebook
  • Pinterest
  • LinkedIn

Like this:

Like Loading...

How To Start Shooting with Confidence

03 Friday Nov 2017

Posted by Kathleen Scanlan in Uncategorized

≈ Leave a comment

Tags

confidence, DSLR, information, Photography, Photography information, photos

Still afraid of your camera?  Are you intimidated by all the things it can do?  That was me a few of years ago when I went digital.

My journey into the world of photography started when I graduated from grammar school and was given a point and shoot film camera for my graduation.  Luckily, it came a few rolls of film.  Back then, having a camera was great but it had its downside too.  You had to pay for film and then pay for processing (developing) of the film later.  Even if you had a darkroom to develop film at home, all the chemicals and paper cost money!  This meant that when I took a picture, I had to really think about what I was doing so I didn’t “waste” film.

Today, the photography world has changed in so many ways.  You can take a photo with your phone, pad, or camera.  A camera can be mounted on your helmut or a phone to a  drone to take aerial shots.  This article is not about those types of “cameras”.  It is only related to the DSLR.

I have been shooting images for, well, a half a century and am still learning.  That is the key; keep learning.  The DSLR camera today certainly does a lot of the work for the photographer. Its advantage over the old SLR  is that it saves money on film and in Auto Mode (almost always) correctly reads light, distance and speed.  All one has to do is focus on the subject matter.  For most people who shoot photos, this is great.  No need to figure out f/stops, speed, or ISO settings to capture that smile, the deer in the field, or the setting sun.

So, the simple answer to gaining confidence is to just take out your camera and use it on the auto mode all the time.  But, that doesn’t always capture the image you are looking for.  It’s “brain” is limited to what it is programmed to do and doesn’t always adjust correctly for lighting (person in foreground comes out perfect but the background does not), for the many variations of light the eye perceives and adjusts to automatically, or even what you want in focus.

A bit more complicated answer to gaining confidence with your camera is to do the tiresome, boring, and any other blah word you can think of and read the manual.   It is filled with magical stuff if you can get through it!

In the past, only four things really mattered with the SLR:  focus,  light (ISO), shutter speed, and depth of field (f/stop).  Get those right and you had a good chance your roll of film had some great images on it .  Today, the DSLR cameras do so much more in-camera.  Colors come out vibrant, black and white as well as color can both be shot at the same time, sepia shots are done in camera, different modes to shoot in, and the list goes on.  But most importantly, you can shoot and delete as much as you want without the “money penalty”, i.e., film development!  We’ve come a long way from the Box camera.

My first DSLR made me crazy trying to figure out all the different icons on the piece of equipment.  Then add to that, taking the information the camera gave me on the back screen and attempting to use my knowledge of SLRs (single lens reflex cameras of old) to get the image I wanted from it!  Very frustrating and I seriously thought of just staying with film.  Of course, in the long run, doing that would become very expensive.  My confidence was at its lowest and I found I really didn’t want to pick up my DSLR at all and so it collected dust for a while.  I really had no confidence that I would be able to use a DSLR (digital single lens reflex) as I had my older film cameras.   I even spent money on classes to hopefully improve my ability to use DSLRs.  Frustration abounded.

Then a lightbulb when off and I now share this “brilliant” idea with you!  Read the manual.  But break it down into small pieces and absorb small portions.  Keep that manual in your camera bag.  Don’t be ashamed to pull it out when you are out shooting.  I have… many times, and still do.  Who can remember everything in that manual?

Boost your confidence by taking time to learn how to shoot in the different modes.  It does work. As I am a “hands on” type of personality and reading how to use my camera was extremely painful.  I only managed to get through the first few pages before I gave up.  So, I finally followed the method below and found it worked for me.  My confidence grew rapidly after that.  Use both your camera and manual for each step.

Use the “auto” mode for about a week.  See how it works.  The next week, go to the Aperture mode (you set the f/stop and the camera does the rest). The following week, switch to changing the shutter speed (Tv on Canon and S on Nikon).  Once you have learned the basics on how to use these three modes, try a week of the programmable mode.  The last one to try for a week is the manual mode.  By the time you get to this one, you will understand how your camera works and how each change you make in camera impacts the image you produce.  Manual mode gives you control over everything.  It’s not for everyone, but I use it with certain types of light because it gives me complete control over the image.

Your camera may not have all the modes I mentioned above, but working with your camera the same way by going through whatever modes it does have, will accomplish the same thing.  You will “know” your camera and your confidence with grow with that knowledge.

Technology is constantly changing.  What is new today is old tomorrow.  Learn the basics of photography, i.e., shutter speed, f/stop, ISO, and focus, and how each interacts with each other.  Confidence is grown by practice and then by continuing to learn.  Grab your camera and go!


Share this:

  • Email
  • Twitter
  • Facebook
  • Pinterest
  • LinkedIn

Like this:

Like Loading...

Light, Camera, Action!

24 Saturday Oct 2015

Posted by Kathleen Scanlan in Photography

≈ Leave a comment

Tags

halloween, Photography, Photography information

Photographers squat, bend, twist, and turn to capture that look or feel they want.  Basically, they move their body into all kinds of positions if necessary to get that one shot that will make their fortune! Those days are pretty much behind me, although I do try!  And, since I am not planning on making any kind of fortune with my camera and shoot because I love trying to capture the moment, my head tends to be on the swivel and my body, well, it creaks and groans if I insist it do something it doesn’t want to do!

The thrill for me is when I download my images and actually have ONE that is exactly what I was looking for; I am always excited and blown away!  Yep, I’m one of those…  Love it when everything just seems to go right!

Shot this image at the zoo!

Shot this image at the zoo!

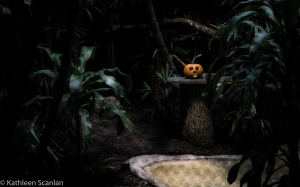
With Halloween around the corner, I headed to the Lincoln Park Zoo in Chicago recently to see if the animals might be into the Halloween spirit.  Imagine my dismay when I found the illusive and rare pumpkin hidden in the gorilla cage.  It didn’t move and did have an expression of shock as if it didn’t think anyone would find it there (this is my story and I’m sticking to it!).

Since this shot was indoors, I set my Canon 6D on manual and the ISO to 1600 so I wouldn’t have to use a flash.  My speed was set at 50 and the f/stop was 5.6.  These settings allowed me to capture the natural light coming in through the roof skylight, darkened the background a bit, and made the focal point stand out from its setting.  It did take quite a few pictures ’til I finally had one that I liked.  Some were too dark, others were too light, some had the fence in focus (not sure how I did that!) and others just weren’t the right angle.  As I have mentioned before, don’t be afraid to take a lot of shots.  Just make sure you move around to get different views of your subject.  My focus was as sharp as I could get it by focusing through the fencing and on the “face” of the pumpkin.  You can actually see the blurred fencing in the man-made pond in the lower right corner.

This was my thought process:  Step 1.  Locate pumpkins at the zoo (didn’t expect to find them in the cages, tho).  Step 2.  Using natural light, give the image a bit of a Halloween “eerie” look.  Step 3.  Using the area around it, give a sense of location (in this case, I kept the blurred fencing in as well as the cement pond in the lower right corner).  Step 4.  Keep the background blurry and dark (that’s why the f/5.6 (aperture) and Shutter speed at 50.  Step 5.  Adjust the image after downloading

The finished product up above has little post work done.  Since I shot in in RAW and not jpeg, I had to adjust the contrast and hue just a little bit and added a bit more saturation to the pumpkin to liven up the color a bit.  This is standard type of post-work when using RAW imaging.  The original image comes out kind of blah but has captured all the data you need to work with it.   Can you get a good image with jpeg?  Yes you can. I just prefer to use RAW.  In a later blog, we’ll go over the differences between jpeg and RAW.

One thing to remember if you are going to adjust your Shutter speed.  Having a slow one tends to pick up any shake that might happen.  Even if you are a steady hand, if you use any setting lower than Shutter speed 40, odds are there will a bit of blurring of your subject unless you use a tripod.  I was very fortunate to be able to steady my camera with my body and the fencing for the 50 shutter speed.  More about this later.

So grab your camera and go find something that strikes your imagination.  Think about how you want to present it.  What mood do you want to convey?  What type of light (natural or flash) do you wish to use to bring out that idea in your head?  Where do you want your subject? (I put my pumpkin in the “jungle” by placing it father back in the image, blurring the foreground and what was behind the pumpkin.)  These are just some thought processes that you should have going on in your head before clicking that picture.  And you will see a great improvement in your final image.

Happy shooting until next time!  If you have questions, feel free to drop me a line.  I may not know all the answers but I have fun finding them!


Share this:

  • Email
  • Twitter
  • Facebook
  • Pinterest
  • LinkedIn

Like this:

Like Loading...

How Close Can You Go?

09 Friday Oct 2015

Posted by Kathleen Scanlan in Photography

≈ Leave a comment

Tags

Background blur, close-up, composition, focus, framing an image, Photo information, Photography, Photography information, zooming

This week, I thought that instead of just harping on some of the do’s and don’ts of composition, I would show you what I did with a Canon DSLR (Digital Single Lens Reflex).  This can also be accomplished with a point and shoot camera or even a cell phone one.

In the past, I have talked about thinking before shooting.  What do you want in the image?  What is your subject matter?  What “feel” do you want the viewer to have?  What’s the story?  The next step is to take the image, of course.  So….

I went for a walk on a  spring day.  It was slightly cloudy but the sun was coming through enough so that a flash was not required (I prefer non-flash images, anyway).  As I walked down my city sidewalk, my head was on a swivel, looking for that one image that yelled “spring has arrived!”  Most people tend to look toward the ground for fresh greenery just breaking ground after a long winter.  Me?  Well, there are days when getting low to the ground for a good shot just aren’t in the cards!  As it was this particular day…

So, heads up and full speed ahead.  Literally.  My eyes were on the trees.  Unfortunately, they didn’t seem to be quite ready for spring.  The branches appeared to be bare.  No apparent budding happening yet.  At least it seemed that way so I changed my though process (I mentioned this in a previous blog. Don’t be afraid to change your mind when out on a photo jaunt).  My new thought was to capture something that reflected the last of winter, like a brown leaf or a fallen acorn left over from last year.  And voila!  I found what looked like an old brown tree flower.

Brown Flower Seed

Brown Flower Seed

It looked so lonesome on the brown branch.  As if it had weathered the rough winter and still hung on for good measure.  The petals were still nice and crisp.  The last of the fall tree flowers.  That was my thought, anyway, when I looked at it.  (Pretty sure there are no such things as Fall tree flowers but my brain doesn’t always accept common sense when I am out with my camera!)

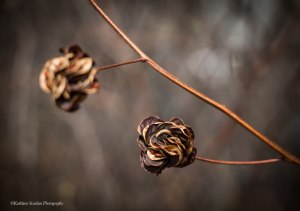
My thought process; focus on the forefront one and keep the farther one out of focus because the back one did not have the nice flowery look to it.  The petals seemed to be bent backward from the center (you can kind of see it in the picture) and the sun highlighted them a bit.  Also, I wanted the background very blurry because it was distracting with fencing and buildings.

Since I was using my DSLR on manual mode, I was able to play with a few settings (ISO, F-stop, and speed) to get what I wanted.  My lens was a 18-135mm zoomed to about 64mm.  We will get more into these numbers and how to play with them in another blog for those of you who have the ability to do it with your particular camera.  But most digital point and shoot cameras as well as telephone cameras have the ability to zoom, so you should be able to get somewhat the same effect as I did.

After finally settling on the image I “envisioned” as the final product, I downloaded it to my computer.  Mind you, I took about 30 images from different angles before I decided this is the one that captured what I wanted to say.  The digital age is a wonderful thing for photography!  No more wasting film or paying for processing of unwanted images!

Now it was time to check out all the details of the petals.  This is when I received my shock…this was not a flower at all.  It was a tree bud of sorts.  The so called-petals were protecting the seeds that the tree would eventually drop.  Since I tend to be very focused when I look through the viewfinder attempting to get the “framing” the way I want, it means sometimes I miss some of the finer details that the camera will pick up.  My focus was on the “flower” and not what it was hiding.

In the middle of the bud are several seeds.  You can seem them in the image below. I cropped the image so that you could see what I missed!   It’s probably one of my favorites of bud images as I have never seen one like it before or since. The bud almost seems to look like a face and is sticking its tongue out at me (that’s just my imagination running wild!).

Close-up of

Close-up of “flower”

As you can see, only the bud shows detail and the branches are out of focus.  All attention is on the “petals” and when you look closely, you see the seeds.  This is what I had talked about in previous blogs about composition.  When someone looks at your image, what draws them into it?  Or is it “flat”, meaning that what you see is what you get.  Had I simply shot this piece without zooming in, the background would have detracted from the bud.  Everything around it would have been as sharp as the bud and the person looking at the image would probably miss the seeds all together.

But with focusing and zooming in on my subject (and a few minor adjustments), the viewer now sees the detail and is drawn into the bud by the white petal that supports the seeds.  My subject matter stands out without anything to impede on the visual aspect of it.  The out-of-focus bud in the background lets the viewer know that this is some kind of tree or bush and not a ground flower.  I purposely placed the subject in the lower right quadrant of the frame so that the viewer would see it first and the lines (branches) lead into the image to show that there are other ones like it on this tree. It would have been nice to have had the sharper bud in the upper left quadrant with the “lines” leading to it but mother nature decided that was not to be.  Sometimes you just have to go with what you got. And yes, this is the actual color of the bud.  Definitely not a spring color!

So, the next time you head out with your camera, look around.  Try getting closer to your subject.  You never know just what your camera will capture.  The human eye adjusts and takes in tons of information.  It’s the camera that actually captures what you really see.  Grab your camera and go!

41.878114 -87.629798

Share this:

  • Email
  • Twitter
  • Facebook
  • Pinterest
  • LinkedIn

Like this:

Like Loading...

What’s in a Frame?

25 Friday Sep 2015

Posted by Kathleen Scanlan in composition

≈ Leave a comment

Tags

composition, framing an image, information, Photography, Photography information

Your first thought when taking a photo, (and it happens like lightening in the brain) is “what do I see”.  Second is “how do I capture it”.  This part of the thinking process takes a bit longer but with practice, comes naturally every time you pick up your camera to shoot.  Building on the idea of composition from my previous blog, it’s time to take a look at how to “frame” your picture.  No, I don’t mean a physical frame, but your visual frame.

As you all know, a frame consists of four corners and four sides.  Well, a square or rectangle one does, anyway, which is what you will be using.  Your camera has a frame inside the viewfinder or on the back screen.  Even those of you using a cell phone camera have a “frame” already in place to work with.  Here’s an exercise I do every time I look through my viewfinder.  Before I snap the picture, I look at the four corners and sides.  Do I have what I want in the image?  Are the corners set the way I want?  Do I have an object in an area along the frame that interferes with my vision? (It takes longer to type this that than to actually think it!)

A bay area in Cinque Terre Italy

A bay area in Cinque Terre Italy

As you can see in the image above, I did not notice the leaves on the left because I was so intent on the boats I completely missed them!  It happens…

My next shot was without the leaves.  This time I checked the “frame” to ensure I didn’t have any “stragglers” along those lines.  But then the image became “boring” for me.  No oomph or specialness.  Just a touristy picture of some boats.

Not all that great!

Not all that great!

So, I expanded my view inside the frame (I had been using a Canon 18-135mm zoom lens) and came up with an image that really was what I was looking for.  There is so much going on in this scene and I got my boats!  The image below tells more of the story of the people living in the Cinque Terre area of Italy and their love of the sea.  It’s filled with the colorful boats as well as lines that draw the eye around the image (more about that later in another blog).  It’s all about the story you want to tell your viewer without having to say a word.

Success!

Success!

You might like the first one and that’s great.  The only thing I would ask you is “why”?  What makes it better than the second or third one.  It isn’t that you are wrong in your thinking, but you might see something I don’t and that’s great!  You are developing your own “vision” and to me, that is what photography is all about.

Ask yourself these two questions when setting up a shot (yep, couple more questions for your brain to ponder).  1. Are you taking a snapshot for a vacation album?   2. Or, are you trying to capture an image to hang on your wall, give as a gift, or to sell?  A well-framed image makes all the difference between a snapshot and a wonderful piece of imagery that you can take pride in.

Practice looking at the corners and sides before snapping and you will be much happier with your results.  It only takes a second.  After a while, it comes naturally (unless you zero in on something like I did and completely missed the huge leaves on the left side!).  One more tibit, be sure to leave some space on the sides, top and bottom in case you decide to crop later.  I will cover this aspect of composition later.  It is one of my worst faults as I try to capture the “perfect” picture in-camera.  Have a great day and get out there and shoot!

Share this:

  • Email
  • Twitter
  • Facebook
  • Pinterest
  • LinkedIn

Like this:

Like Loading...

I’ve Finally Done It…!

12 Saturday Sep 2015

Posted by Kathleen Scanlan in Photography

≈ 3 Comments

Tags

Adobe, information, Lightroom, Lightroom CC, Photo information, photo work, Photography, Photography information, photos, Photoshop, Photoshop CC, post-work

Hi Everyone! I have finally entered the world of Blogging that everyone else has been in for years! Sometimes it takes time for those of us who were not born into the computer age to finally figure out how to use the “techy” stuff.

After I retired from my second love (where I had to make money to help raise a family), I jumped back into photography only to find myself completely perplexed and confused with all the new technology in this arena. Although I love photography and all that it entails, I was lost amid all the new digital cameras, post work programs, and information available on the internet. Half the time, I would read an article and still be lost as I don’t have a computer or techy mindset. All I wanted was an answer to a simple question in PLAIN english. And so, a blog is born…

In future blogs, which I plan on keeping it short and to the point (at least that’s the plan. Who wants to read long, run-on articles all the time?), I will share what I learn as I move on with my photography. Currently, I use both Photoshop CC and Lightroom CC for my filing and post-work (boy, were they a struggle to learn for me!).

I invite you to join me on my journey into the world of digital photography as I find my way around . Future blogs will contain helpful hints on composition, framing, and post -work, all written in a plain, down to earth language.

Well, here goes nothing…click!

41.878114 -87.629798

Share this:

  • Email
  • Twitter
  • Facebook
  • Pinterest
  • LinkedIn

Like this:

Like Loading...

Subscribe

  • Entries (RSS)
  • Comments (RSS)

Archives

  • March 2018
  • February 2018
  • December 2017
  • November 2017
  • October 2017
  • October 2015
  • September 2015

Categories

  • composition
  • Lightroom Tips
  • Photography
  • Uncategorized

Meta

  • Register
  • Log in

Create a free website or blog at WordPress.com.

Privacy & Cookies: This site uses cookies. By continuing to use this website, you agree to their use.
To find out more, including how to control cookies, see here: Cookie Policy
  • Follow Following
    • KES Photography
    • Already have a WordPress.com account? Log in now.
    • KES Photography
    • Customize
    • Follow Following
    • Sign up
    • Log in
    • Report this content
    • View site in Reader
    • Manage subscriptions
    • Collapse this bar
 

Loading Comments...
 

    %d bloggers like this: