• KES Collections
  • About

KES Photography

~ Photographic Techniques Simplified

KES Photography

Tag Archives: information

Merging in Lightroom

14 Wednesday Mar 2018

Posted by Kathleen Scanlan in Lightroom Tips

≈ Leave a comment

Tags

creativity, images, information, Lightroom, Lightroom CC, Lightroom information, Lightroom merge, Merge, Merging images, Natural Light, Photography, Photography information, Photography postwork, post-work

When Lightroom was initially introduced to the market, it did not have the means to merge photos together. You had to use Photoshop to create a multi-layered image. Today, you can do that work right inside Lightroom with ease.

When shooting without a flash and with a bright background, the image in the front of the light will come out very dark. Now, no one wants the main image “in the dark”.  In the photos I am using for an example of bright backgrounds, I didn’t want to use a flash and didn’t want to lose the background either by opening up the stops to accommodate the image in the forefront.  So, I headed to Lightroom for a solution!
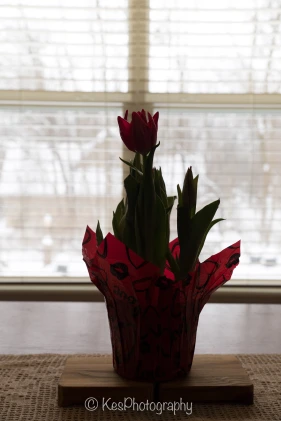
Orignal-7158.jpg

Lightroom now allows you to merge two or more images by compressing all the image data into one HDR image using very simple steps. Don’t be put off by “HDR”. In this instance of over-bright background, it is just a beginning point.  You can still adjust the final HDR product to your vision.

If you are steady-handed, shoot three or more photos with different speed stops without moving your focus.   For this article, I used my Canon 6D on a tripod and set my camera to shoot +/- one stop which means it will shoot the scene at a base stop that I set, then shoot ¾ higher (+3/4) and ¾ down (-3/4). I rarely do a full stop either way.  I set my ISO to 200 although I could have gone higher but didn’t want graininess in the images. Last but not least, my f-stop was set at 6.3.

Another way to shoot is to start at the high end of the speed you want to use and shut down a -1/2 stop for several more images.  The outcome will be the same.  This can also be done in reverse by adding +1/2 stop.

 The most important thing to remember when merging photos in Lightroom is that they are to be unprocessed. Another words do not do any post work on the images you plan on using.

Here are the two (yep, only two) steps for merging photos in Lightroom:

  1. Select the photos you wish to merge together. They have to be in consecutive order and have + or minus (-) speed settings for this to work (as mentioned above).  On a Mac, click on the first image and Cmd/Shift-click on the last image in Lightroom Classic CC to select the group of images you wish to use. I chose to use the three below.
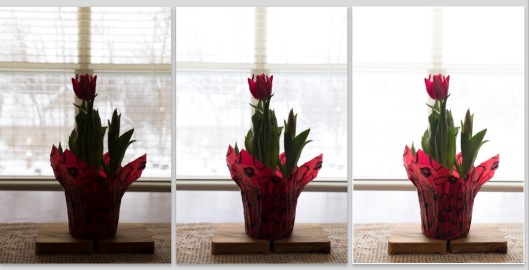
Screen Shot 2018-03-07 at 1.29.11 PM.jpg

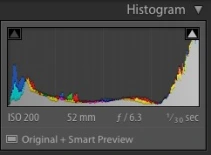
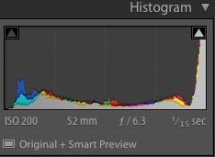
The histograms of each shot shows that I used shutter speeds of 1/80, 1/30, and 1/15 (the reason 1/60 is missing is because I deleted it before deciding to merge the images.  (Accidentally tripped over the tripod and the image was blurry!  Not a good idea…)
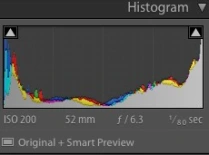
image 1.jpg Image 2.jpg Screen Shot 2018-03-07 at 1.32.16 PM.jpg

  1. Select Photo > Photo Merge > HDR. or press Ctrl+H.  Photo Merge is just below “Edit In”.
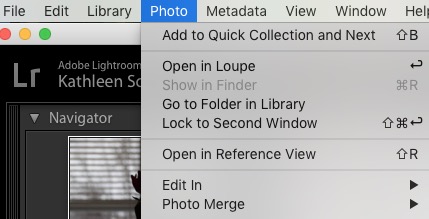
Step 2a.jpg

  1. Another box (HDR preview box) will pop open. This is where your final image will be created. You can select or deselect the following:

Auto Tone: Provides a good starting point for an evenly-toned merged image.  You can turn this off and see what happens.  Don’t panic if you see a dark image.  All the data is still there.  Lightroom just didn’t make adjusts; you can do this once  you accept the preview.
Auto Align: Useful if the images being merged have slight movement from shot to shot. Enable this option if the images were shot using a handheld camera. Enabling this option may not be necessary if the images were shot using a tripod.  The way to tell if you really need it is to zoom in on the image to see if everything aligns.

While you are making your choices, Lightroom is busy combining your chosen photos into one preview.

Screen Shot 2018-03-07 at 11.34.59 AM.jpg

After deciding on those two options, you can choose how much “deghosting” you may need.  This occurs when some transparency from the one image to the next occurs while merging.  For example: a bird or plane flying across the sky. Each frame will have the bird or plane in a different position. You might see the ghost of the bird or plane in each position in the final image.  Deghost will take care of this.

You can preview the effects of these settings right within the dialog box once the image downloads.   Play with it a bit so you understand how the options affect your final image.  Then, accept the image.

My final HDR image turned out to be a far cry from what I envisioned.  As you can see, it came out rather bright while the plant detail is nice and sharp.  A little too bright for me!  (Remember, earlier I stated that you can adjust your final HDR image.)

HDR 1-2.jpg


When you merge images in Lightroom, the program creates a new file/image. It combines all the data from the images you used to create the HDR image and compresses that date into one file. This means you can adjust the final image as if it was the original shot but with a whole lot more data to work with.  In my example, it probably had three times the image data since I used three images.


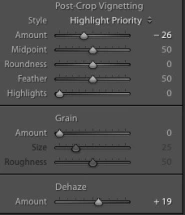
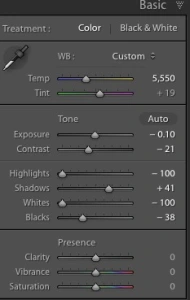
Because my final HDR image was not quite what I wanted (again, I could have turned Auto Tone off and made adjustments from that image), I decided to do some further adjustments in Lightroom on the new file/image.  Now the image looks much more natural and the details of the plant are still nice and sharp.  This, I like!
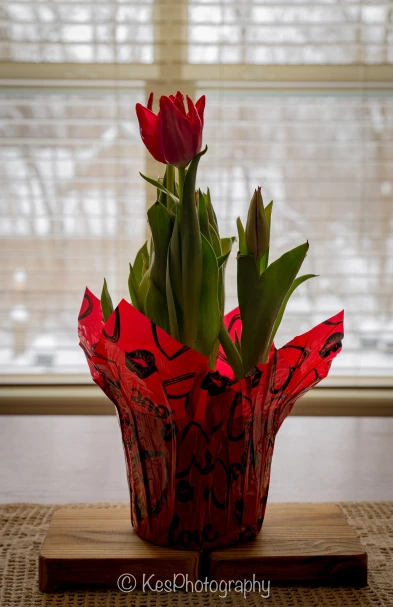
HDR Final-2.jpg

HDR 2a.jpgHDR 2.jpg


So the next time you want to play with your camera, try this neat trick out. Take several shots of one object, using several different speeds. Combined them in Lightroom and see what you can create. Have fun!

Advertisement

Share this:

  • Email
  • Twitter
  • Facebook
  • Pinterest
  • LinkedIn

Like this:

Like Loading...

How Many Tripods are Too Many?

25 Saturday Nov 2017

Posted by Kathleen Scanlan in Uncategorized

≈ Leave a comment

Tags

Benro, equipment, information, Photography, photography equipment, tripods

How many tripods are too many?  That was a real dilemma for me once. I bought so many that I had more tripods than all my other photography equipment put together!

My very first one was very inexpensive ($19.99 on sale!)). It had its issues but was what I could afford at the time and it worked for me. It was lightweight and fairly easy to use. I progressed up to a better one when the first one could not handle longer lenses (it tended to tip over from the lens weight).

My next tripod was made for the heavier equipment (camera and telephoto/zoom lenses). And it was built sturdier which made the tripod heavier to carry around. The shoe plate (where the camera attaches to the tripod) was set in one position which meant it only took landscape shots.  A great tripod for the price. That one cost me around sixty dollars. I was in heaven until…

A new one came out on the market. The shoe plate could now be positioned in the portrait mode by twisting a knob at the base of the shoe plate and tilting the platform to the side. What an innovation! The legs collapsed fairly easy although I constantly forgot to tighten them once they were fully extended from time to time! Timber!…

At this point, I have three tripods.   I took the the first one traveling as it was light aluminum and as long as I wasn’t using a long lens, it worked great. The second had the weight to hold longer lenses but was just as long as the first one when the legs collapsed (down to around 40 inches) and heavier to carry around. The third one was just like the second except the platform/shoe plate could be flipped to the side for portrait shots.

We’ll skip the next two tripods that joined the family as one was given to me and the second one I purchased thinking I was “moving up” with my equipment because I paid more for it. The reality was that I only purchased the company name. The tripod turned out to be the same as the third one I had purchased for much less. That makes five tripods for one camera!

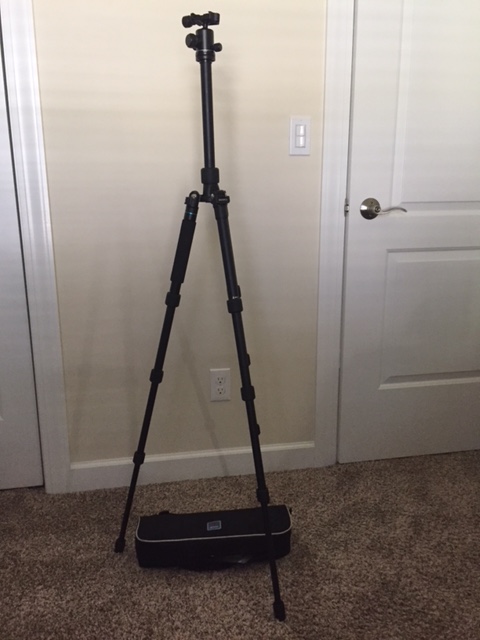
Then a few years ago, the photography world comes out with this awesome portable tripod. This time I did a lot more research on the subject. I found one that folded down to only 16.5 inches, fit in its own pouch (or a backpack), was sturdy enough to handle my equipment, was easy to assemble, came with a built in counter weight for those heavier lenses, the shoe plate sat on a “ball” (ball head) and could be set in many directions, and many more extras that all my other ones combined did not have. Eureka!

It is the only one I use now. It is a Benro A 1692T tripod. It cost a bit more ($300.00) but well worth the money. Three years later, I still love it.

IMG_1184

Today, there are less expensive portable tripods. Neewer is one company that sells them on Amazon. And I am sure there are others but I am no longer in the market for one. Currently, I own three tripods but really only use one, my Benro. The other two are for remote flash set ups (fill light).

You might ask, “what did you do with the other three”? Sold them on eBay and put the money toward my Benro, of course! There is always a market for used equipment.

A few things to remember when looking for a tripod: Make sure it can handle the weight of your equipment, has sturdy legs and if at all possible, a counterweight hook under the shoe plate to steady the tripod if necessary (this is especially handy when your ground is a bit rocky). And most importantly, the tripod does all that you need or want it to do.

How many are too many tripods? That depends on how you feel about tripods. For me, I am happily down to three; two that sit in my closet until I need them and one that I carry everywhere.

Have a great day and happy shooting!

Share this:

  • Email
  • Twitter
  • Facebook
  • Pinterest
  • LinkedIn

Like this:

Like Loading...

How To Start Shooting with Confidence

03 Friday Nov 2017

Posted by Kathleen Scanlan in Uncategorized

≈ Leave a comment

Tags

confidence, DSLR, information, Photography, Photography information, photos

Still afraid of your camera?  Are you intimidated by all the things it can do?  That was me a few of years ago when I went digital.

My journey into the world of photography started when I graduated from grammar school and was given a point and shoot film camera for my graduation.  Luckily, it came a few rolls of film.  Back then, having a camera was great but it had its downside too.  You had to pay for film and then pay for processing (developing) of the film later.  Even if you had a darkroom to develop film at home, all the chemicals and paper cost money!  This meant that when I took a picture, I had to really think about what I was doing so I didn’t “waste” film.

Today, the photography world has changed in so many ways.  You can take a photo with your phone, pad, or camera.  A camera can be mounted on your helmut or a phone to a  drone to take aerial shots.  This article is not about those types of “cameras”.  It is only related to the DSLR.

I have been shooting images for, well, a half a century and am still learning.  That is the key; keep learning.  The DSLR camera today certainly does a lot of the work for the photographer. Its advantage over the old SLR  is that it saves money on film and in Auto Mode (almost always) correctly reads light, distance and speed.  All one has to do is focus on the subject matter.  For most people who shoot photos, this is great.  No need to figure out f/stops, speed, or ISO settings to capture that smile, the deer in the field, or the setting sun.

So, the simple answer to gaining confidence is to just take out your camera and use it on the auto mode all the time.  But, that doesn’t always capture the image you are looking for.  It’s “brain” is limited to what it is programmed to do and doesn’t always adjust correctly for lighting (person in foreground comes out perfect but the background does not), for the many variations of light the eye perceives and adjusts to automatically, or even what you want in focus.

A bit more complicated answer to gaining confidence with your camera is to do the tiresome, boring, and any other blah word you can think of and read the manual.   It is filled with magical stuff if you can get through it!

In the past, only four things really mattered with the SLR:  focus,  light (ISO), shutter speed, and depth of field (f/stop).  Get those right and you had a good chance your roll of film had some great images on it .  Today, the DSLR cameras do so much more in-camera.  Colors come out vibrant, black and white as well as color can both be shot at the same time, sepia shots are done in camera, different modes to shoot in, and the list goes on.  But most importantly, you can shoot and delete as much as you want without the “money penalty”, i.e., film development!  We’ve come a long way from the Box camera.

My first DSLR made me crazy trying to figure out all the different icons on the piece of equipment.  Then add to that, taking the information the camera gave me on the back screen and attempting to use my knowledge of SLRs (single lens reflex cameras of old) to get the image I wanted from it!  Very frustrating and I seriously thought of just staying with film.  Of course, in the long run, doing that would become very expensive.  My confidence was at its lowest and I found I really didn’t want to pick up my DSLR at all and so it collected dust for a while.  I really had no confidence that I would be able to use a DSLR (digital single lens reflex) as I had my older film cameras.   I even spent money on classes to hopefully improve my ability to use DSLRs.  Frustration abounded.

Then a lightbulb when off and I now share this “brilliant” idea with you!  Read the manual.  But break it down into small pieces and absorb small portions.  Keep that manual in your camera bag.  Don’t be ashamed to pull it out when you are out shooting.  I have… many times, and still do.  Who can remember everything in that manual?

Boost your confidence by taking time to learn how to shoot in the different modes.  It does work. As I am a “hands on” type of personality and reading how to use my camera was extremely painful.  I only managed to get through the first few pages before I gave up.  So, I finally followed the method below and found it worked for me.  My confidence grew rapidly after that.  Use both your camera and manual for each step.

Use the “auto” mode for about a week.  See how it works.  The next week, go to the Aperture mode (you set the f/stop and the camera does the rest). The following week, switch to changing the shutter speed (Tv on Canon and S on Nikon).  Once you have learned the basics on how to use these three modes, try a week of the programmable mode.  The last one to try for a week is the manual mode.  By the time you get to this one, you will understand how your camera works and how each change you make in camera impacts the image you produce.  Manual mode gives you control over everything.  It’s not for everyone, but I use it with certain types of light because it gives me complete control over the image.

Your camera may not have all the modes I mentioned above, but working with your camera the same way by going through whatever modes it does have, will accomplish the same thing.  You will “know” your camera and your confidence with grow with that knowledge.

Technology is constantly changing.  What is new today is old tomorrow.  Learn the basics of photography, i.e., shutter speed, f/stop, ISO, and focus, and how each interacts with each other.  Confidence is grown by practice and then by continuing to learn.  Grab your camera and go!


Share this:

  • Email
  • Twitter
  • Facebook
  • Pinterest
  • LinkedIn

Like this:

Like Loading...

What’s in a Frame?

25 Friday Sep 2015

Posted by Kathleen Scanlan in composition

≈ Leave a comment

Tags

composition, framing an image, information, Photography, Photography information

Your first thought when taking a photo, (and it happens like lightening in the brain) is “what do I see”.  Second is “how do I capture it”.  This part of the thinking process takes a bit longer but with practice, comes naturally every time you pick up your camera to shoot.  Building on the idea of composition from my previous blog, it’s time to take a look at how to “frame” your picture.  No, I don’t mean a physical frame, but your visual frame.

As you all know, a frame consists of four corners and four sides.  Well, a square or rectangle one does, anyway, which is what you will be using.  Your camera has a frame inside the viewfinder or on the back screen.  Even those of you using a cell phone camera have a “frame” already in place to work with.  Here’s an exercise I do every time I look through my viewfinder.  Before I snap the picture, I look at the four corners and sides.  Do I have what I want in the image?  Are the corners set the way I want?  Do I have an object in an area along the frame that interferes with my vision? (It takes longer to type this that than to actually think it!)

A bay area in Cinque Terre Italy

A bay area in Cinque Terre Italy

As you can see in the image above, I did not notice the leaves on the left because I was so intent on the boats I completely missed them!  It happens…

My next shot was without the leaves.  This time I checked the “frame” to ensure I didn’t have any “stragglers” along those lines.  But then the image became “boring” for me.  No oomph or specialness.  Just a touristy picture of some boats.

Not all that great!

Not all that great!

So, I expanded my view inside the frame (I had been using a Canon 18-135mm zoom lens) and came up with an image that really was what I was looking for.  There is so much going on in this scene and I got my boats!  The image below tells more of the story of the people living in the Cinque Terre area of Italy and their love of the sea.  It’s filled with the colorful boats as well as lines that draw the eye around the image (more about that later in another blog).  It’s all about the story you want to tell your viewer without having to say a word.

Success!

Success!

You might like the first one and that’s great.  The only thing I would ask you is “why”?  What makes it better than the second or third one.  It isn’t that you are wrong in your thinking, but you might see something I don’t and that’s great!  You are developing your own “vision” and to me, that is what photography is all about.

Ask yourself these two questions when setting up a shot (yep, couple more questions for your brain to ponder).  1. Are you taking a snapshot for a vacation album?   2. Or, are you trying to capture an image to hang on your wall, give as a gift, or to sell?  A well-framed image makes all the difference between a snapshot and a wonderful piece of imagery that you can take pride in.

Practice looking at the corners and sides before snapping and you will be much happier with your results.  It only takes a second.  After a while, it comes naturally (unless you zero in on something like I did and completely missed the huge leaves on the left side!).  One more tibit, be sure to leave some space on the sides, top and bottom in case you decide to crop later.  I will cover this aspect of composition later.  It is one of my worst faults as I try to capture the “perfect” picture in-camera.  Have a great day and get out there and shoot!

Share this:

  • Email
  • Twitter
  • Facebook
  • Pinterest
  • LinkedIn

Like this:

Like Loading...

I’ve Finally Done It…!

12 Saturday Sep 2015

Posted by Kathleen Scanlan in Photography

≈ 3 Comments

Tags

Adobe, information, Lightroom, Lightroom CC, Photo information, photo work, Photography, Photography information, photos, Photoshop, Photoshop CC, post-work

Hi Everyone! I have finally entered the world of Blogging that everyone else has been in for years! Sometimes it takes time for those of us who were not born into the computer age to finally figure out how to use the “techy” stuff.

After I retired from my second love (where I had to make money to help raise a family), I jumped back into photography only to find myself completely perplexed and confused with all the new technology in this arena. Although I love photography and all that it entails, I was lost amid all the new digital cameras, post work programs, and information available on the internet. Half the time, I would read an article and still be lost as I don’t have a computer or techy mindset. All I wanted was an answer to a simple question in PLAIN english. And so, a blog is born…

In future blogs, which I plan on keeping it short and to the point (at least that’s the plan. Who wants to read long, run-on articles all the time?), I will share what I learn as I move on with my photography. Currently, I use both Photoshop CC and Lightroom CC for my filing and post-work (boy, were they a struggle to learn for me!).

I invite you to join me on my journey into the world of digital photography as I find my way around . Future blogs will contain helpful hints on composition, framing, and post -work, all written in a plain, down to earth language.

Well, here goes nothing…click!

41.878114 -87.629798

Share this:

  • Email
  • Twitter
  • Facebook
  • Pinterest
  • LinkedIn

Like this:

Like Loading...

Subscribe

  • Entries (RSS)
  • Comments (RSS)

Archives

  • March 2018
  • February 2018
  • December 2017
  • November 2017
  • October 2017
  • October 2015
  • September 2015

Categories

  • composition
  • Lightroom Tips
  • Photography
  • Uncategorized

Meta

  • Register
  • Log in

Create a free website or blog at WordPress.com.

Privacy & Cookies: This site uses cookies. By continuing to use this website, you agree to their use.
To find out more, including how to control cookies, see here: Cookie Policy
  • Follow Following
    • KES Photography
    • Already have a WordPress.com account? Log in now.
    • KES Photography
    • Customize
    • Follow Following
    • Sign up
    • Log in
    • Report this content
    • View site in Reader
    • Manage subscriptions
    • Collapse this bar
 

Loading Comments...
 

    %d bloggers like this: